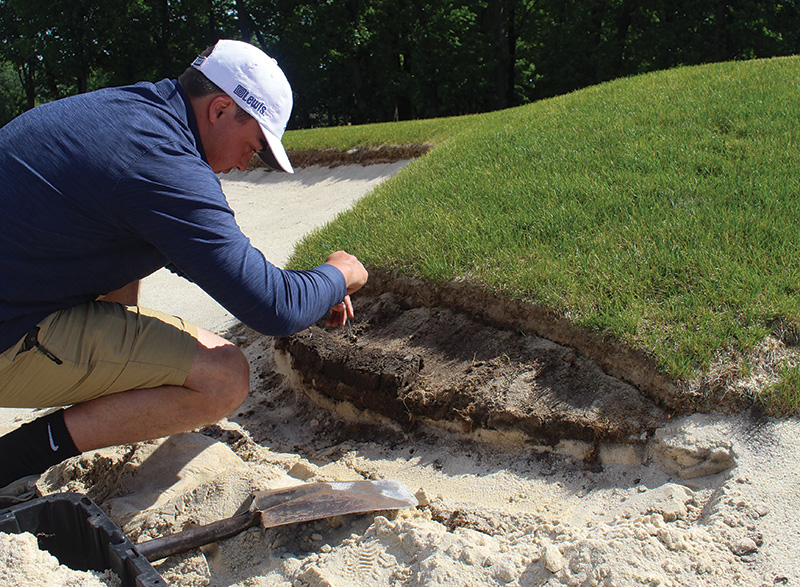
Hazeltine National Golf Club intern Tyler Kropuenske uses sod staples to secure the bricks in place during the repair of a bunker edge using the “sod brick” method. Photos by Chad Blank
Bunkers beg for attention. Beyond the controversy they are sometimes synonymous with, the sand-filled cavities can be a focal point of a golf shot, hole or even an entire property. While the uncertain walk to a bunker shot is a fundamental component of
the game of golf, so too are the visual and strategic elements that bunkers provide, whether or not golfers even play from them.
The mere presence of a bunker can intimidate, deceive or fascinate a golfer readying their swing or looking upon a golf course. In acquiring these feelings, it is the sense of contrast between bunkers and turfgrasses that lends one to focus on the beauty
and difficulty of golf. Tan, white and even black sand stands out sharply among the surrounding green, yellow and brown hues of turfgrass. Adequate contrast, however, would be incomplete without a border or perimeter between the two.
A bunker’s edge is where sand meets turf, where penalty area meets playing field. It is the identifying characteristic that creates the area from which a golfer’s mind instinctively signals “avoid.” Satisfactory edges are vital
to the existence of a bunker, yet maintaining them is indeed difficult. Frequency and factors of a bunker’s use tend to deteriorate edges and lead to less definition and contrast over time.
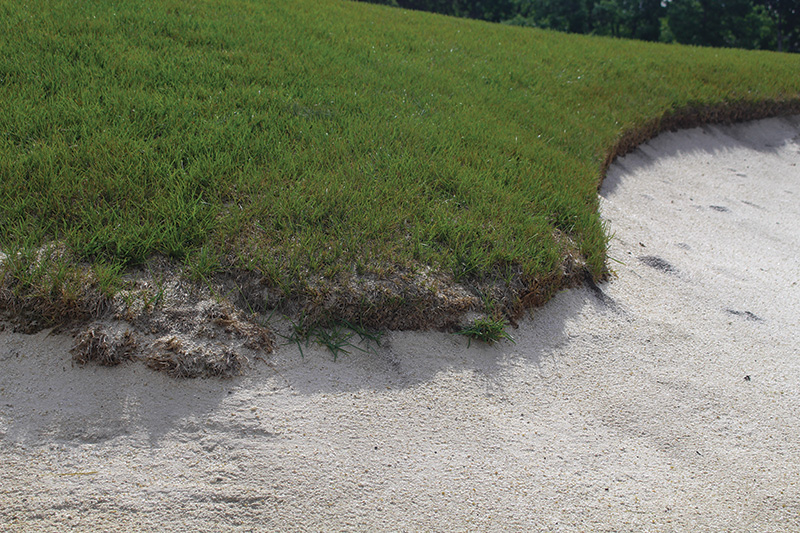
An example of how bunker edges can deteriorate over time. This particular edge partially collapsed when a mechanical bunker rake ran up over this area.
A poorly placed step of a golfer or the unskilled entry of a mechanized rake can collapse a portion of an edge in one movement. The gradual accumulation of sand may also weaken the distinction. Declining turf lessens contrast by blending together the
interface of the two elements as opposed to continuing to separate them.
At Hazeltine National Golf Club in Chaska, Minn., our bunkers are entering their 12th year. Designed with steep faces, our bunkers are limited by select entry points that have greatly deteriorated in some areas over the last decade. This past season we
undertook the task of reestablishing these edges. After limited results with more popular techniques — namely, iterations of the plywood and sandbag methods — we landed on utilizing sod “bricks” to act as immediate structural
support to lay soil behind and then sod over.
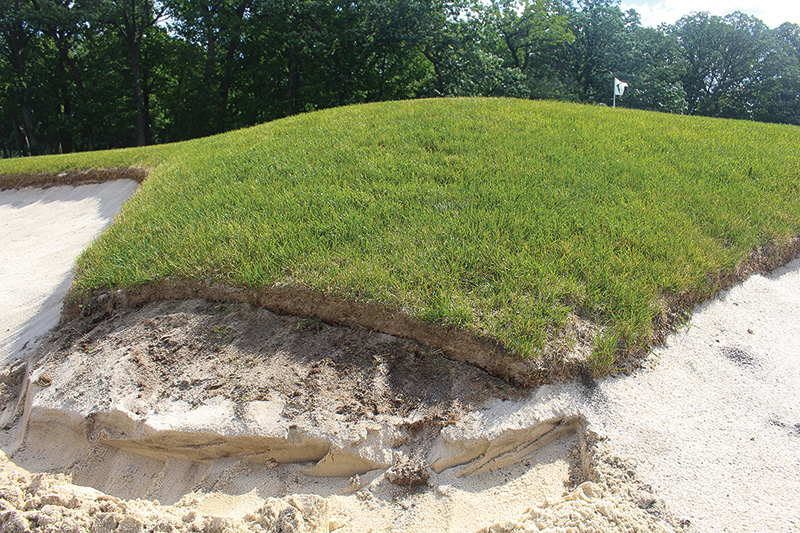
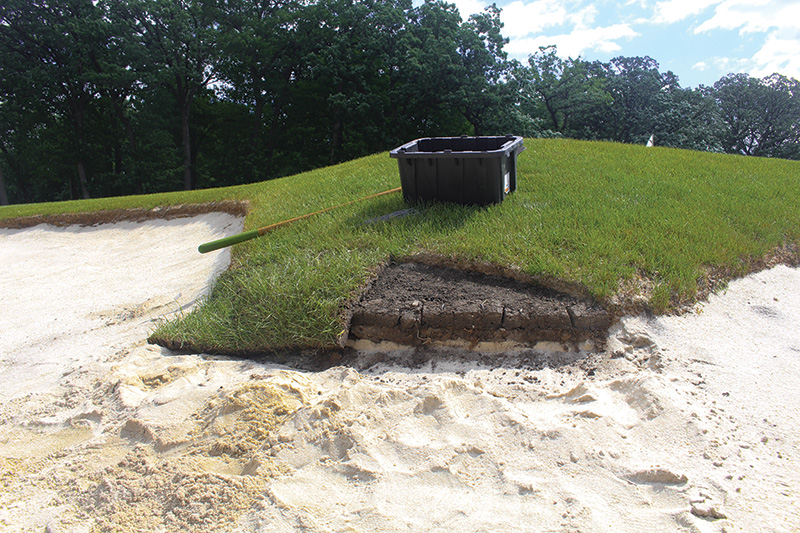
Two angles of the first step in the process, the removal of sand and less-than-ideal turf from the bunker’s edge. At this stage, all of the damage is removed, as well as sand that has accumulated over time. This provides a fresh canvas from which to add bricks and backfill with soil.
Plan of attack
Bunker work of any degree can be daunting and time-consuming. When beginning the process to remedy or improve bunker edges at any facility, it is of utmost importance to identify what it is you wish to accomplish with your efforts and why you wish to
make an improvement. Has an edge collapsed completely? Has sand accumulation weakened the turf’s appearance below a defined standard, or have the boundaries of a bunker altered substantially? In our case, various developing issues led our project
to be guided by the following goals:
- Quickly return bunkers to play with minimal establishment time.
- Eliminate “movement” of edges by returning bunker perimeters to their intended limits.
- Replace sand accumulation with favorable soil and a more tolerant turfgrass stand.
- Provide seamless transition between re-established and untouched edges.
Those of us charged with executing the project were especially adamant about a long-lasting result that would not have to be addressed on a recurring basis.
After we identified an area for reconstruction, sand still contained within the bunker and near our targeted construction zone was pulled away to provide a clear workspace and lessen the risk of contaminating sand within the bunker itself. If possible,
we employed a sod cutter to disturb areas behind the immediate edge to make hand removal easier. Using flathead shovels we removed the turfgrass and any accumulated bunker sand or contaminated soil into the back of a utility vehicle. This material
was disposed of. Final excavation in the most severe of cases was up to 5 inches deep and 2 feet back from the desired edge of the bunker. The demolition process was unchanged from our experience with the plywood or sandbag method.
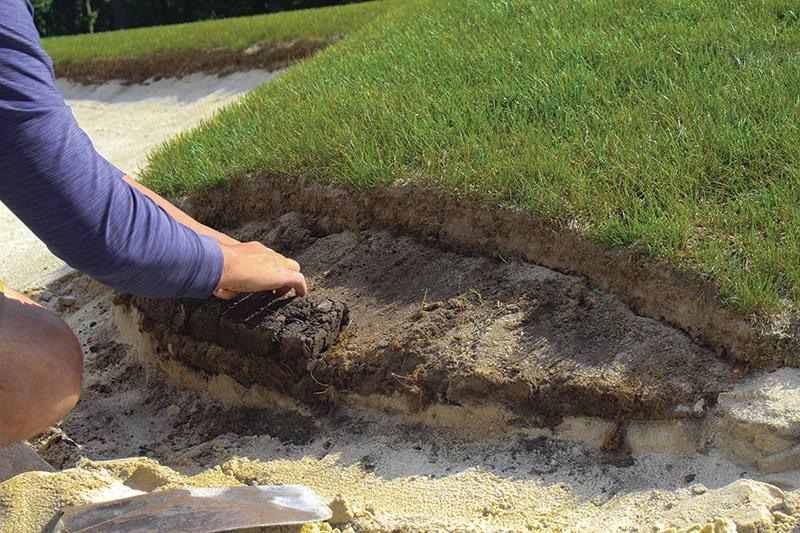
A close-up look at sod bricks being laid in place. They are then secured with sod staples.
Brick basics
In utilizing sod bricks to reconstruct our edges, we looked for sod with deep and prevalent root mass to help in holding the bricks together. Naturally, this led us to use an area surrounding our short grass nursery that consists largely of turf-type
tall fescue, but any well-rooted grass should suffice. It was necessary to remove and dispose of the plant material at and above the thatch layer in order to allow our eventual sod an accessible rooting point. This was done much in the same fashion
as fraze mowing, using a sod cutter set at a low depth. The product of this process cut the top of the bricks and left our desired material exposed, but still in the ground.
To cut the bottom of our bricks, we then set our sod cutter at its maximum depth and cut over the now-exposed area again. A strong root mass and adequate moisture allowed the soil to cling together while being cut from underneath with the knife of the
sod cutter. The cavity now contained a large swatch of soil held together by root mass much akin to a laid-out roll of sod.
The sides of our bricks were determined by the cuts that would create their final shape. These were made vertically across the material every 3 inches using flathead shovels. Now in their final dimension of 21⁄2 inches deep by 3 inches wide, the
bricks could be gently released and removed from the ground with a hand tool. The dimensions of the bricks could easily be altered using a different depth on the sod cutter and smaller or larger spacings with the hand shovel. For the purpose of transportation,
we used small bins to harvest about 15 bricks at one time, moving between our reconstruction areas and nursery as more bricks were needed.
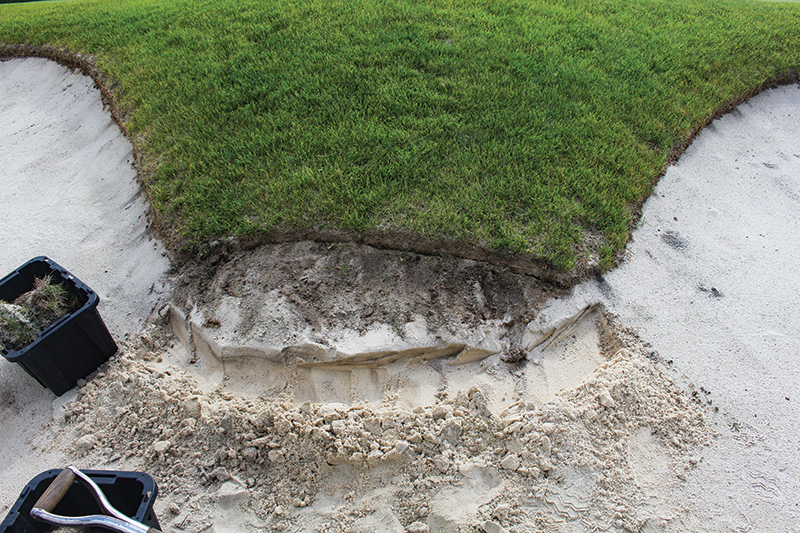
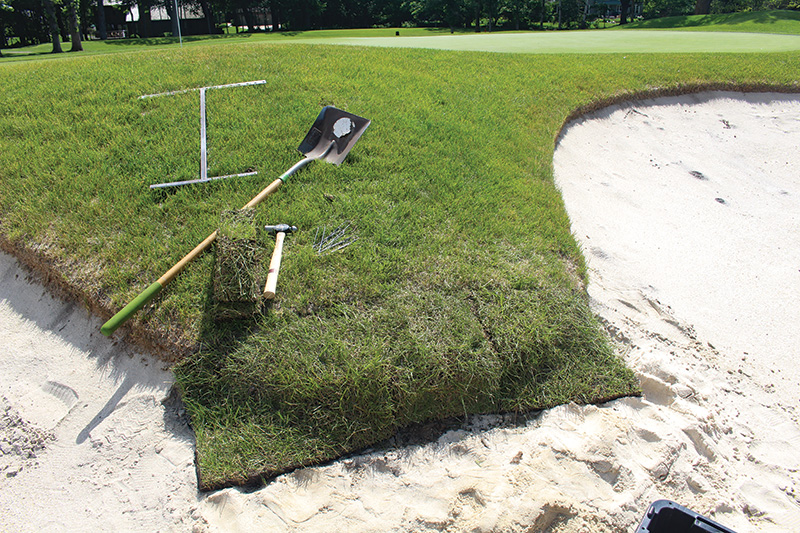
After the sod bricks are in place, the area being repaired is backfilled with soil and, at Hazeltine, covered with turf-type tall fescue pulled from the club’s on-site nursery.
Starting over
Returning to our excavated bunker edge, sod staples served as the “mortar” to secure the base layer of bricks to the exposed soil as well as to one another. The initial layer was placed up against the limits of our bunker liner, which served
to show us the position of the intended edge. The malleability of the bricks allowed for them to be shaped by hand or with a mallet to best follow the organic edge of the bunker.
Depending on the level of excavation, more layers of brick were added to fit the desired height of the lip.
At this point in the process, we had essentially created a wall that separated our excavated area and the bunker itself. The careful addition of soil to the cavity followed by subsequent hand-tamping and slight watering gave us a medium from which to
further sculpt a desired grade quickly. Rock, leaf and bunker rakes were generally sufficient in achieving the desired outcome; much in the same way of leveling any other area for sod.
As a rule of thumb, our staff at Hazeltine generally uses turf-type tall fescue when sodding any areas of rough. Given Minnesota’s cool climate and our own irrigation limitations around bunkers, the tolerant aspects of our turf selection will help
it perform adequately along our edges. Deliveries of sod from a local farm supplemented our own nursery’s supply.
When laying and stapling the sod to the exposed soil and sod bricks, it was our aim to reduce potential for drying out. Because vertical gaps are especially prone to moisture loss, we laid each strip beginning at the bottom of our sod bricks, moving over
and then away from the edge. Curves proved to be especially difficult in piecing together seams, but we found that cutting overlapping pieces in place was the best way to overcome this issue. Milorganite at a heavy, open rate was used beneath and
on top of the sod to help in rooting.
The edge of this bunker is completely covered with sod, but not yet trimmed back to fit the organic curve of the bunker nose. Sod staples were utilized here along the vertical portion of the edge in an effort for the sod to establish and prevent soil from washing out as it begins to root.
Getting it growing
The majority of our bunker edge work this past season took place from early August into October. Given the sloped nature of our bunker edges, we found that it could be hard for the newly added material to hold moisture. Quick and frequent watering helped
in preventing any loose soil from flowing into the sand while also allowing the plant enough moisture to begin establishing into our bricks and the soil. The typical sodding quip of “making it float” was not something we attempted.
The smaller areas we reestablished were able to be put back into play quickly. Green and white stakes served to indicate the freshness of the sod and keep golfers cautious of the ground they were stepping on. On steeply sloped edges or those that required
more excavation, rope and stakes were needed but positioned in a way that did not eliminate all of the entry and exit points.
Areas sodded later last fall needed further care as we started this season. The edges first sodded at the conclusion of summer began to blend in with the established rough as the spring progressed; these required minimal hand-watering by May. Similarly,
portions sodded the prior fall did not need additional watering by the time the heat stress of July approached. It is our expectation that little if any evidence of our work will be visible to the untrained eye after one full season of establishment.
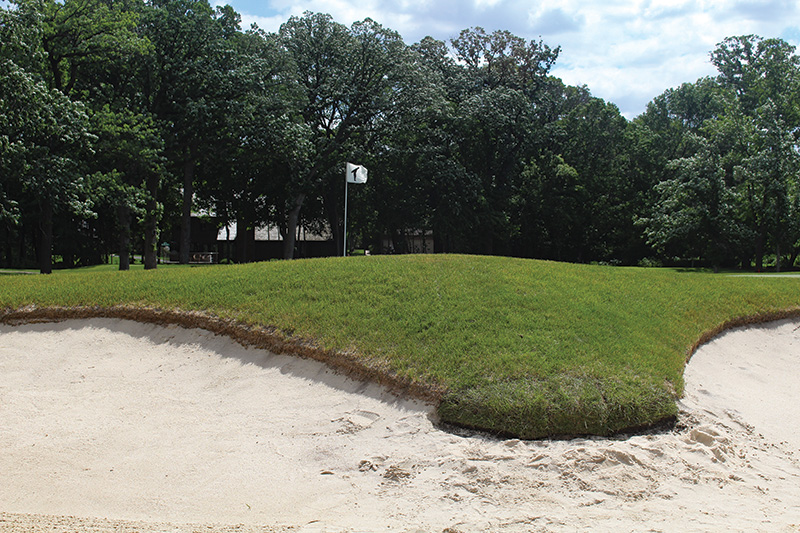
The finished product shows the area of repair with the sod trimmed back but still overlapping the bunker’s edge. When watered, these areas provide good protection against soil contamination.
What’s old is new again
Sod as a building material is not new technology. Interestingly, the use of sod homes, or “sodies,” in Minnesota dates back at least to the homesteading era of the 1800s. For our purposes, we found this method of construction as a quick way
to solve the structural and aesthetic roots of the problem we faced. While bunkering varies significantly from course to course, architect to architect and from geographic region to region, they remain a fundamental part of any property that employs
them.
A golfer may not enjoy spending any portion of their round playing a shot from the sand; truer still, they may very well enjoy the walk to their ball even less. However, it is important for turf managers to tend to edges when they are able and preferably
before they become a problem. Issues in these types of penalty areas — where consistency is increasingly preached — are even more susceptible to complaint and can ultimately impact the enjoyment of a customer, member or their guest. From
the visual contrast an edge provides to their literal delineation of playing areas, a well-shaped and uniform edge is far superior to a degrading one for these reasons.
While our sod brick method may not fit every superintendent’s toolbox for their bunker regime, it has become one within our team. It is our belief that any golf course — regardless of budget or available resources — could utilize this
technique or components of it to improve the experience of the golfers that patronize their facility.
Chad Blank is an assistant superintendent at Hazeltine National Golf Club in Chaska, Minn., and a five-year member of GCSAA.